A Beginner's Guide to Test Automation

What is Test Automation?
In simple terms, test automation is like having a robot sidekick who does all the repetitive work for you. Instead of manually checking every part of your software to see if it's working (which can take hours, or even days!), you write a set of instructions for your robot friend to do the job. It follows those instructions and runs tests automatically, checking everything is working just as it should. Sounds like magic? It’s actually super handy!
Why Is Test Automation Important?
Test automation speeds up the process of software development like a rocket 🚀.
It helps you:
Save Time: Robots don’t get tired, so they can work 24/7 without any coffee breaks. You get quick results, every time.
Do More Testing: Imagine testing everything on your software manually—it’d take forever! With automation, you can test more things in less time (and no one gets carpal tunnel from clicking over and over!).
Catch Bugs Faster: You know those little bugs that sneak in unnoticed? Automation helps you catch them faster, so you can fix things before they become big problems.
In short, test automation is like giving your software a superpower by using robots to do the heavy lifting. It makes testing faster, more accurate, and a whole lot more fun. Plus, it leaves you with more time to drink coffee or go for a walk in the park, knowing your software is in good hands (or should we say, "robot claws"?).
Benefits of Automation Over Manual Testing
Let’s face it, no one likes doing the same thing over and over. That’s why test automation is awesome:
Speed: Automation works faster than a human ever could. It’s like a speed racer vs. a walking tortoise. Automated tests zip through the software in minutes!
Accuracy: Robots never get bored. They do the same thing every single time, which means fewer mistakes.
Reusability: Once you’ve taught your robot how to test something, it can do it over and over, no extra effort required.
Let's Get Started!
Ready to become a test automation superhero? With just a little practice, you’ll learn how to use tools that make testing fun and easy. Let’s dive in and start exploring the world of test automation!

Setting up Required Software Tools Installing Java - Step-by-Step Guide
Java is the main programming language for many test automation tools, including Selenium. Here's how to install it:
Download Java
Go to the official Java website: (Click Here) Choose the correct version for your operating system (Windows, Mac, Linux) and download the installer.
Install Java
Run the installer and follow the on-screen instructions. After installation, check if Java is installed by opening a command prompt and typing.

If Java is installed correctly, it will show the version number.

Set Up JAVA_HOME Environment Variable
To make sure Java works properly, set the JAVA_HOME environment variable: On Windows: Right-click My Computer > Properties > Advanced System Settings > Environment Variables.
In the System Variables section, click New and set the variable name as JAVA_HOME, and value as the directory where Java is installed (e.g., C:\Program Files\Java\jdk-11.0.10)
Overview of Integrated Development Environments (IDEs)
An IDE (Integrated Development Environment) is a software application that provides tools for writing, testing, and debugging code.
It simplifies the process of writing test scripts by providing features like code suggestions, syntax highlighting, and debugging tools.
Some popular IDEs for Java development are:
* Eclipse
* IntelliJ IDEA
* NetBeans
For this guide, we’ll focus on Eclipse, one of the most commonly used IDEs for Selenium.
Download and Set Up Eclipse IDE
Download Eclipse
Go to the official Eclipse website: (Click Here) Choose Eclipse IDE for Java Developers and download the installer for your operating system.
Install Eclipse
Run the installer and follow the prompts. Choose a folder to install Eclipse in and wait for the installation to finish.
Open Eclipse
After installation, open Eclipse. It will ask you to select a workspace your projects will be stored). Choose a location and click Launch.
Configuring the Eclipse Environment for Selenium
Install Selenium WebDriver in Eclipse and Set Up ChromeDriver
When you're working with Selenium to automate tests on Google Chrome, you need two main things:
* Selenium WebDriver – A tool that lets you control the Chrome browser.
* Chrome Driver – A separate tool that acts as a bridge between Selenium and Chrome.
However, Chrome Driver needs to match the version of Google Chrome installed on your system. If the versions of Chrome and Chrome Driver don’t match, the automation won’t work.
Step 1:
Install Selenium WebDriver in Eclipse
Open Eclipse
Launch Eclipse, your Integrated Development Environment (IDE), where you’ll write and run your test automation scripts.
Go to Help Menu
In the menu bar, click on Help.
Click on Eclipse Marketplace
In the Help menu, select Eclipse Marketplace. This is where you can search for and install plugins that help enhance Eclipse.
Search for Selenium
In the Eclipse Marketplace search bar, type Selenium and click Go.
Install Selenium WebDriver
You’ll see a list of results. Look for Selenium WebDriver and click Install next to it. Follow the installation prompts to complete the process.
Restart Eclipse
After Selenium WebDriver is installed, Eclipse will ask you to restart the restart.
Configuring the Eclipse Environment for Selenium
Step 2: Download and Set Up Chrome Driver
Now that you’ve installed Selenium WebDriver in Eclipse, you need Chrome Driver to control Google Chrome.
Download Chrome Driver
Go to the official Chrome Driver download page: (Click Here)
Choose the Right Version
Find the Chrome Driver version that matches your installed version of Google Chrome.
To find your Chrome version:
Open Chrome.
Click on the three dots in the top-right corner.
Go to Help > About Google Chrome.
You’ll see the version number, like Chrome 94.0.4606.81. Download the corresponding Chrome Driver version for that Chrome version from the Chrome Driver website.
Extract Chrome Driver
After downloading, extract the chrome driver executable file to a folder on your system (e.g., C:\webdriver\chromedriver.exe on Windows).
Configuring the Eclipse Environment for Selenium
* Add Selenium JARs to Your Project
* In Eclipse, create a new Java project by going to File > New > Java Project.
* Right-click on your project and select Build Path > Configure Build Path.
* Under the Libraries tab, click Add External JARs and select the Selenium
* JAR files you downloaded earlier.
Click Apply and Close.
Create a Simple Test Script
* Right-click on src > New > Class to create a new class file.
* Write a simple test script that opens a browser using Selenium, such as:

* Replace "path_to_chrome_driver" with the path where the Chrome Driver is located on your system.
Run Your Test
* Click the Run button in Eclipse to execute your script. If everything is set up correctly, a browser will open, navigate to Google, and display the title in the console.
LOCATING WEB ELEMENTS IN SELENIUM
Overview of Locators in Selenium
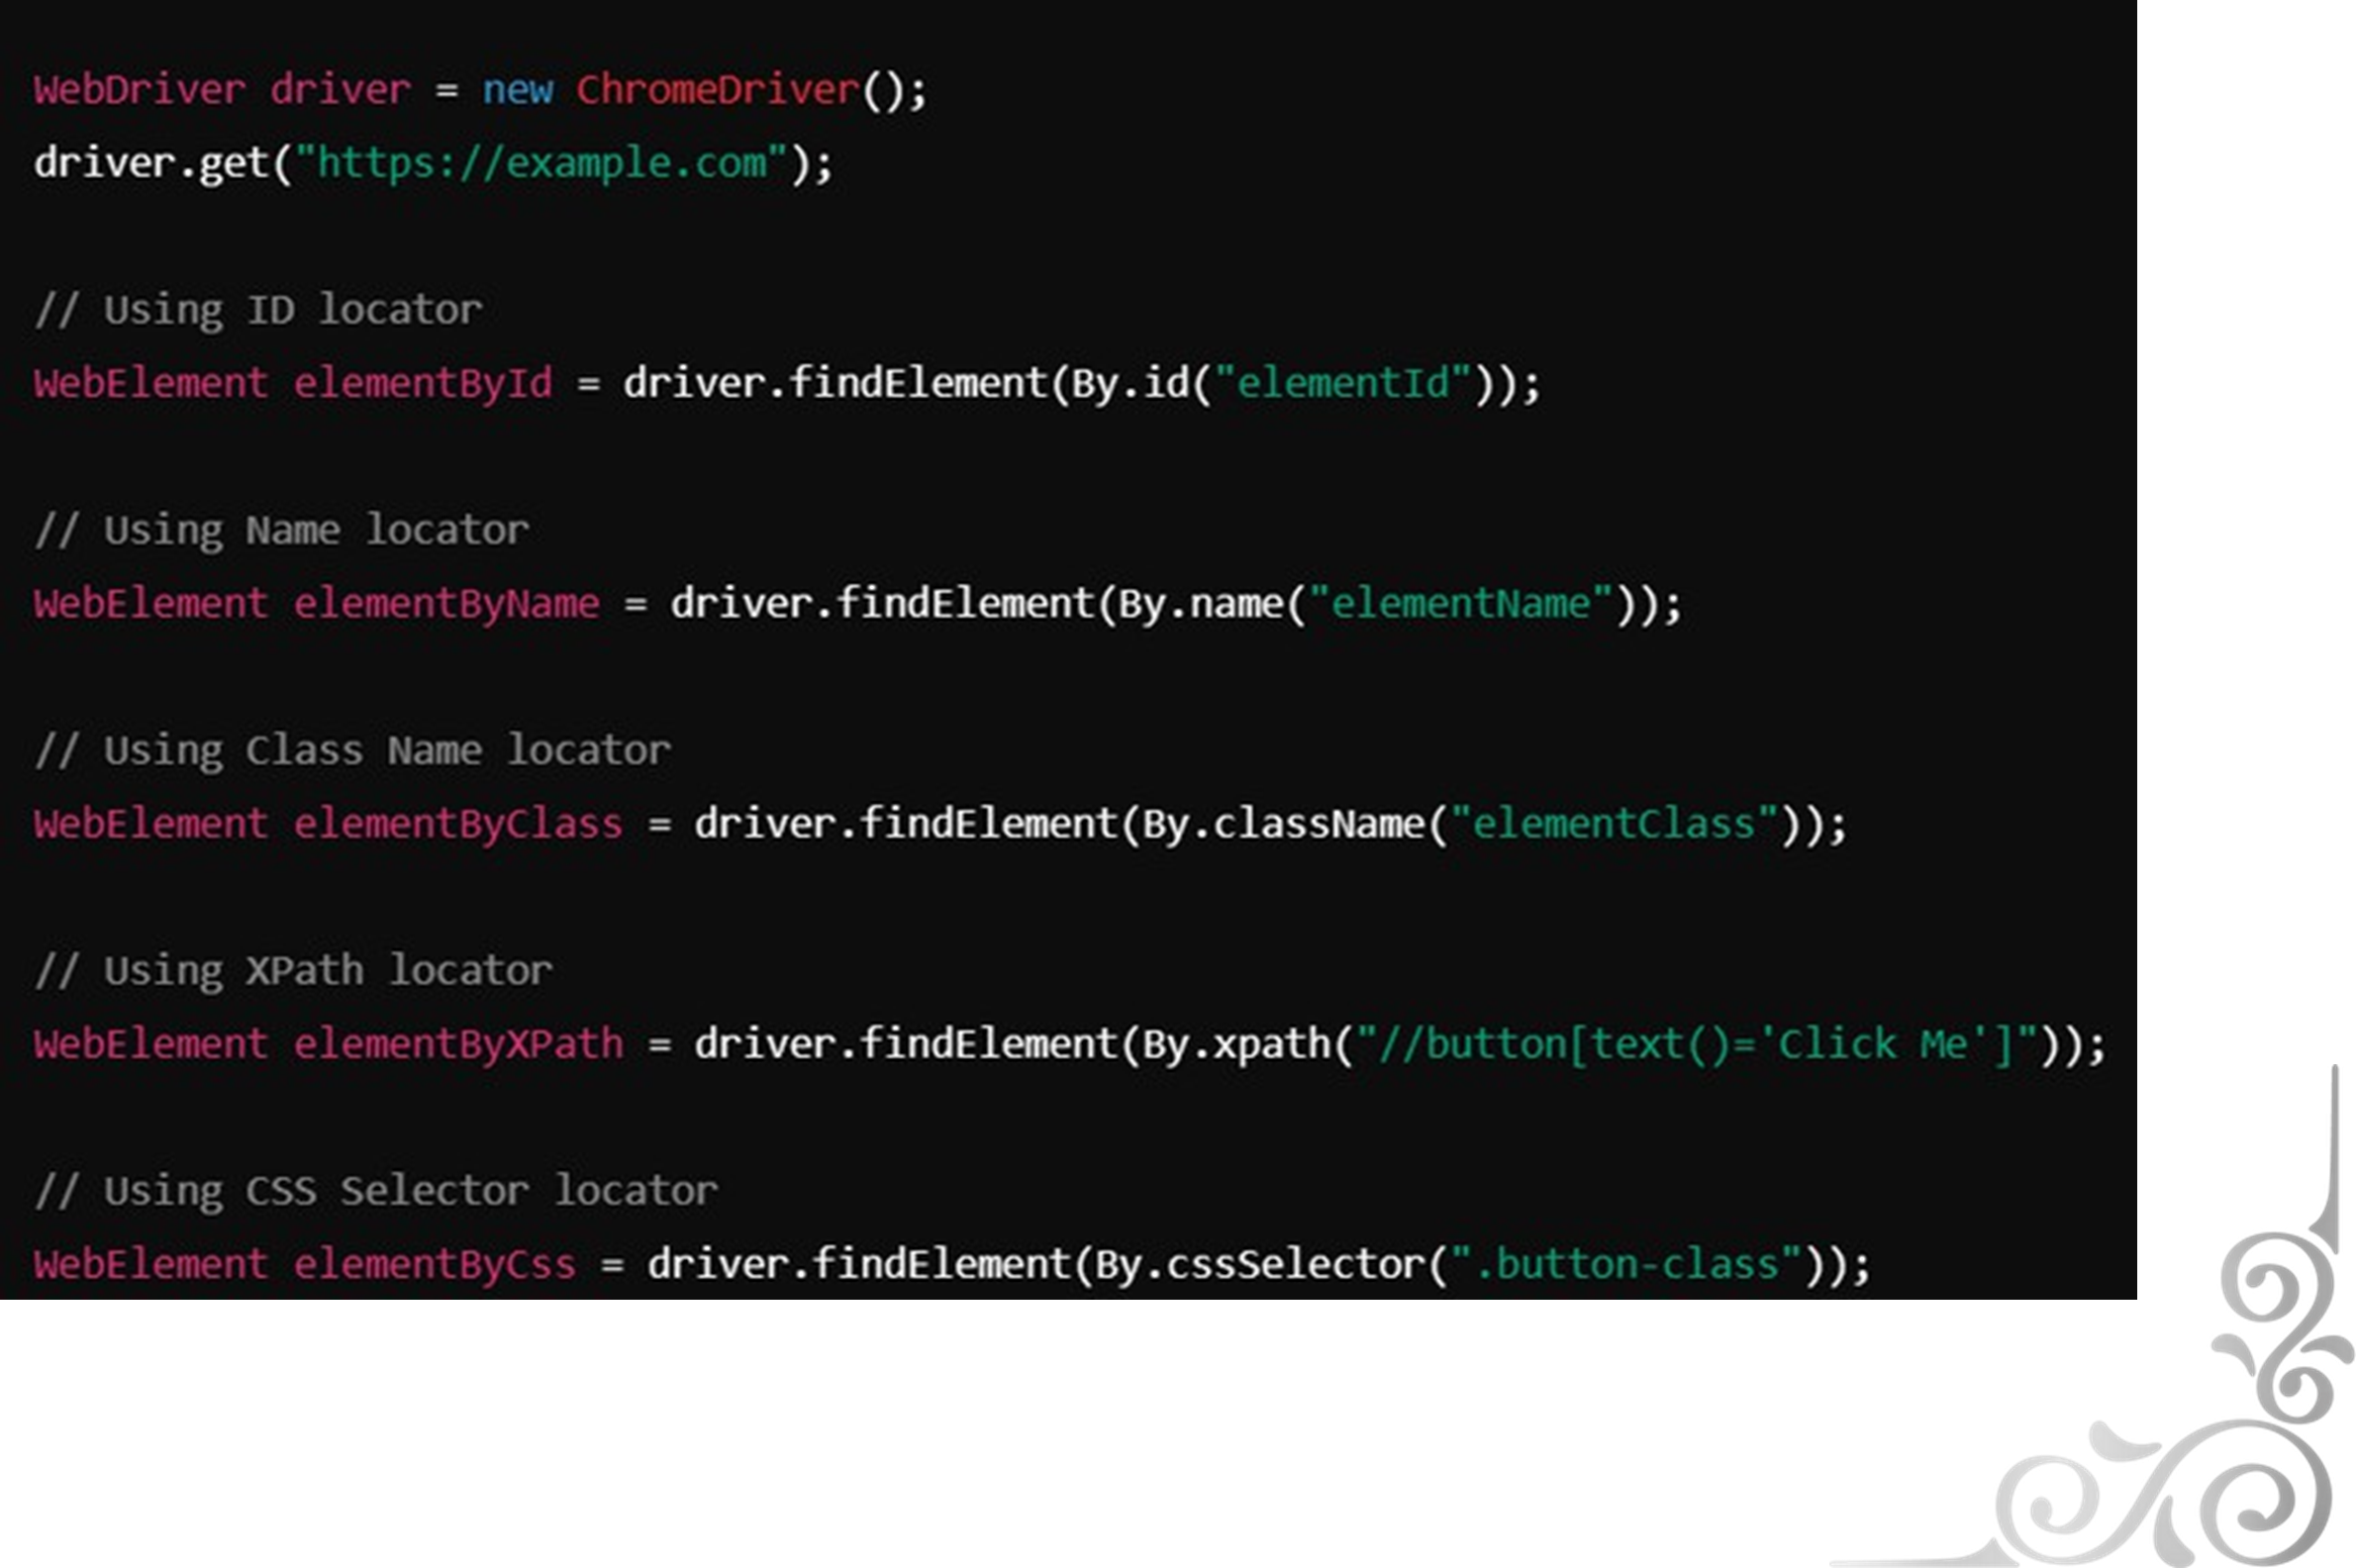
In Selenium, locators are used to identify and interact with web elements like buttons, text boxes, links, etc. You can use different types of locators to find these elements.
ID: Unique identifier for an element. It's one of the most reliable locators.
Name: Name attribute of an element, commonly used for form elements.
Class Name: Identifies elements by their class attribute.
XPath: Path expression used to locate elements based on their XML structure or text.
CSS Selector: Uses CSS syntax to select elements by their attributes, classes, or IDs.
Methods to Identify Web Elements
You can identify web elements using several methods in Selenium, depending on the locator type you want to use. Here’s how you can use each locator in your script:

Locating Web Elements in Selenium
Best Practices for Selecting Locators Effectively
To make your tests reliable and maintainable, use the best practices for selecting locators:
Use ID When Possible:
The ID locator is the fastest and most reliable because it’s unique to the element on the page.
Avoid Overusing XPath:
While XPath is powerful, it can be slower and less reliable than other locators, especially if the structure of the page changes frequently. Use XPath only when necessary . (e.g., when elements don't have unique IDs or names).
Use CSS Selectors for Flexibility:
CSS selectors are versatile, and they are faster than XPath. You can select elements based on various attributes, making them a good choice for general use.

Test Locators in the Browser First:
Before adding locators to your test script, test them directly in the browser’s developer tools (e.g., in the Chrome DevTools Console) to ensure they work and uniquely identify the element.
Important Notes for Automation Testing
Driver Setup:
Ensure that the Chrome Driver (or any browser driver you're using) version matches the installed browser version. If they don’t match, the test won’t work.
Avoid Hard-Coding Credentials:
Never hard-code sensitive information like usernames and passwords directly in your scripts. Use environment variables or external configuration files for better security.
Element Identification:
Always choose the best locator (e.g., ID is generally the best) for identifying elements. Avoid using fragile locators like XPath that depend on the page structure. CSS selectors are usually fast and effective.
Browser Compatibility:
If your tests are intended for multiple browsers, consider running your tests on different browsers like Firefox, Chrome, Safari, etc., and use a tool like Selenium Grid to run tests on multiple browsers simultaneously.
Handling Alerts and Pop-ups:
Selenium can handle browser alerts, pop-ups, and dialogs. Use Alert interface methods like accept(), dismiss(), getText() for interaction with these pop-ups.
Browser Driver Management:
Always make sure that the WebDriver path is correct. Instead of manually setting it, you can use tools like WebDriverManager to automatically download and set up the appropriate browser drivers.
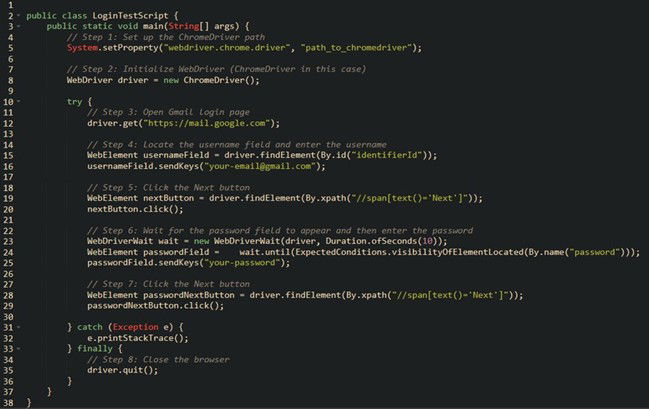
SAMPLE SELENIUM TEST SCRIPT FOR WEBSITE LOGIN

EXPLANATION:
- WebDriver Setup: Set up the Chrome Driver and initialize the WebDriver instance.
- Open Gmail: Navigate to the Gmail login page.
- Enter Username: Locate the username field using its ID (identifierId) and enter the Gmail username.
- Click Next: Find the "Next" button using an XPath expression and click it.
- Wait for Password Field: Use WebDriverWait to wait for the password field to appear, then enter the password.
- Click Next: Find the "Next" button for the password and click it.
- Close Browser: After completing the test, close the browser using driver.quit().
Good Luck
About the Author
Mohamed Aadhil is a Software Quality Assurance Engineer - Trainee | Undergraduate at SLIIT | Specializing in Information Technology | Automation & Manual | WordPress | SFC® | Founder of Meraki Images courtesy of Mohamed Aadhil and Getty Images.
An online pdf version is also available.
***
Writer's Block Submissions Sought

Are you looking to elevate your writing profile and services?
Consider featuring your articles and blogs on our website, "Writer's Block," a vibrant platform dedicated to creative expression through writing.
We invite articles that explore the nuances of the writing process, creativity, and related themes.
Your work will receive prominent exposure across our extensive social media networks, along with opportunities for further networking. Additionally, select articles will be included in a special book publication for charity, to be determined in January 2025.
For more details, please contact us at ink@reink.art We are excited about the prospect of showcasing your talent!